This is my Grandma's 1956 United
Big Ball Bowler game named Duck Pin Alley. I have only found one person
who has ever seen this exact machine before. The other machine
they saw was in "very rough shape" so I am guessing it's not
operational. So this is the only working one of these specific machines
we've been able to locate so far.
The back story to
this machine is that my grandparents purchased the machine
from a local bar for my uncle, for his 8th grade graduation
present. This was in 1962. My grandma seems to remember the
bar making mention of something along the lines of the fact
that "they don't manufacture this machine any more, so we are
worried we won't be able to find parts for it if it breaks."
So there were just two owners. It sat in the bar for a few
years, and then it's been in my Grandma's basement ever since.
So that's the reason why it's so well (overall)
maintained!
I've been trying
to date this machine and we've settled on the year 1956 for
the manufacture date. 1955 and earlier machines used a
30v power supply and this machine we believe uses 50v, the
same as other similar type machines. Other similar
machine, which we talk about next was also manufactured in
1956, so I would have to think this machine would be from that
same year. So with that said, I believe this machine is
one of, if not the first big ball bowler machines that United
ever made.
While looking for
more information on the machine I came across
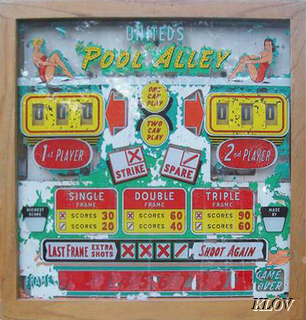
this
machine
online. In that
particular machine you used a cue stick
and pool balls, instead of bowling balls. This is a
strange mesh of two games if you ask me,
pool and bowling put together in the same game. I do not know
which game came first. The Pool Alley game came out
in 1956, so I would have to assume that the Duck Pin
Alley game came out around the same time. The two games are
remarkably similar. They seem to share the same
pin hood, pins, wooden side of the lanes, and almost
the same back glass artwork. The game mechanics appear to be
a little different as Pool Alley has a Single/Double/Triple
scoring feature and Duck Pin Alley has normal
scoring and then also a "Beer Frame" feature (not sure exactly what
that does yet).
I am working to restore the Duck
Pin Alley machine to good working order. There
are a few issues with the machine, but nothing too serious (I hope). The
known issues are as follows:
The scoring reels are sticking
and aren't spinning properly. I hope to be able to clean these up
so they spin properly.
There are a few pins which immediately
upon the start of a frame, the pins go up as if they have
been
knocked down. This may just be caused by
a stuck lever or something else. I have not yet been able to
diagnose it, but soon.
The #1 pin is missing a piece, which
causes the pin to swing freely when in
the down position. This does not affect the gameplay, but I would like
to fix it anyway.
The
#3 is cracked and has been super glued
back together. It works for the time being, but if I can find
a replacement, I will.
I was told that
the pin reset motor for these machines is rare and that I
likely won't ever be able to find a replacement for
it. So I was advised to pay close attention to
this and to clean it up very good. So I need to
take it apart and bore it out and make sure to get rid of
any and all caked in grease that may be gunking it
up.
Then of course I do intend to clean up the machine
as much as possible.
A few collectors
and enthusiasts have asked for more pictures and videos, so I
thought I'd make a little web page to show it all. Also
so that I have a venue to post pictures when I have questions
as I go along restoring it. I also thought that
some other casual onlookers might appreciate some pictures, at
least the pictures of the outside of the machine.
I know that very few people will be interested in seeing the
detailed pictures of the inside of the machine, but they are
here for those who are interested.
First, before I get to the pictures,
here's a few details about the machine:
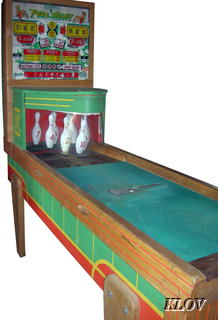
The bowling lane itself is about 117
inches or 9 feet 9 inches long.
When measured from the back of the
back box to the front of the machine, the machine is about 132
inches or 11 feet long.
It is believed that the original
size ball used on this machine was a 4 inch ball. More
on that later.
The pins used seem to be the
standard United type pins used in a few other
machines. The pins are about 8.5 inches
tall. The distance from the top of the pin down to the
hanging holes is approximately 1.25 inches down. The
distance between the mounting holes is approximately 0.75
inches. I am listing these specific measurements
because they are needed when speaking with others about
finding replacement pins.
This machine is numbered
#352. I do not know if this game was mass
produced, but you'd have to assume that United started the
numbering scheme at 1. So there are at least over 352 of
these machines which existing at some point in time.
OK, onto the
pictures. How I usually do things is that each
picture is a smaller type thumbnail of the picture. This
size picture makes them easier for most people to view in a
browser. If you ever want
more detail on a particular picture, you can click on it, and
it will take you to the full resolution
picture.
Outside
Pictures
The back glass:
The back glass with the lights
on:
The back glass and top of the
hood:
The pin hood and pins:
Close up of the pins:
How the game essentially works, the
ball rolls over these little levers:
The long lane with ball return on the
left (this is the only machine I've found where the ball
return is on the left):
The coin door with the United Mfg Co
logo on it I believe:
The instructions on the front of the
lane. It's very curious to me that they actually refer
to the ball as a "Puck". United made shuffle board type
bowlers as well, where you used a puck instead of a
ball. So perhaps they simply reused the artwork:
A shot of the side art:
The front of the machine's side
art:
The ball ramp return. A few
people feel that the supports under the rails might not be
original to the machine. They look more like a piece
that might have come off a metal front door to your
house. I would probably agree with this
assessment. They do look a little out of
place. I did not notice any disturbance in the
artwork otherwise, so I don't think there was any other
supports that they replaced. So either those are
original (doubtful) or else there just simply weren't any
supports originally. In either case, I guess I'm
not too worried about it. The supports are there now,
and they serve a prupose, so I intend to leave them in place.
Another view of the ball ramp
return:
The end of the ball ramp return.
The balls gain just enough momentum from the ramp to make it
up this last hill where the balls rest:
Here is a short video of the
gameplay:
Ball Info and
Return System
There has been some speculation as to
what size ball the machine originally used. It's
my belief that this machine originally used a four inch
ball. This is a surprise to some people because
they felt that a three inch ball was more standard for that
time period. The picture below shows one of
the balls that we used with the machine my whole youth.
I believe this machine is one of the ones which came with
the machine. It is a four inch
ball. I'm not sure if you can tell from
the picture but those weird white lines are super glue.
The ball essentially shattered when someone dropped it on the
floor. So we tried to super glue the large chunk
back into the ball. We did keep the ball around
however, so we could use it for size comparison:
The first ball below is a trackball
for an arcade machine. I used it in my testing because
it is a 3 inch ball. Some people felt this was the
likely size of the balls used in the machine. I
have found that is not the case, as you will see in the video
shown further below. The middle ball here is
a replacement 4 inch ball that we found at some
point. And lastly, on the far right is a 4.5
inch ball. I purchased 5 of these balls on my
local Craig's list. A pretty lucky find. We
should now have enough balls to last us forever.
Here is a short video of the ball
return system in action, along with me testing the various
different ball sizes. - The first ball I use
in the video is 4.5". As you can see in the video, the 4.5"
ball works fine and returns well on the rail return system.
- The second
ball is the 4" size ball, which is what I believe to be the
original ball size used. It works well and returns well
on the rail return system. - The third ball I use in
this video is a 3" ball. I did this to put to rest any
question that this game used a 3 inch ball. As you can see in
the video, the ball is too small, and when returning on the rail return system it actually hits some of
the support beams which slows down the speed of the ball
and as a result, the ball does not make it all
of the way up to the top of the return rail. Now I did
mention earlier that these supports might not be original from the manufacturer. So you
could argue that even though the 3 inch ball didn't work, it might just be
becuase of the after market rail supports. But I can tell
you that they've been there since 1962 when my Grandma got the
machine. And as I mentioned they've been using what I believe to be 4 inch
original balls with the machine since then. So I really feel that 4 inch has to
be the proper size ball, and the original size ball
for this machine.
ESCAPE WHILE YOU CAN!
For
the more casual type viewers, this is your chance to
escape. The pictures from this point on go more
into the more details and technical pictures, which I imagine
will not interest most people, only collectors and
enthusiasts. If you'd
like, you can click on THIS LINK to
skip down to the "Completed!" section to see the final
result!
Pin
Information
I was told, and I will include it here
for completeness, that there are two different pin hanging
gear assemblies used for these types of pins. The 1-6
pins use one kind, and the 7-10 pins use a different
kind.
I am showing this picture of the pin
assembly, so that I can point out the bow tie like piece
above. This piece appears to hold the pin in place when
its in the down position:
I am missing the bow tie like piece
for the #1 pin as you can see below. This causes the pin
to swing freely when the pin is in the down position.
Luckily this does not affect gameplay, but I'd like to fix it
all the same:
You can see the United stamp on the
pins here. Man, I did not realize how filthy this
thing has become over the years until I looked at the back of
the pins! Definitely going to be giving the machine a
thorough cleaning!
Here you can see the cracked #3 pin
which has been super glued back together. It does work
fine for the time being, but if I can find a replacement pin,
I'd like to replace it:
You can see the pins are 8.5 inches
tall:
The mounting holes are appriximately
1.25 inches down from the top of the pin:
The mounting holes are approximately
0.75 inches apart in total distance:
Pin Box
Pictures
Here is a picture with the hood
open:
Another picture under the hood:
Back Box
Pictures
Here's the inside of the back
box:
The score reels, which both need to be
worked on to allow them to spin more freely:
The machines label as
#352. Elsewhere in the machine you can see that
same number written on the inside of it, in marker, chalk and
one other label like this one. Curiously, as you can see
under this label is the number 253, which is the reverse of
352. Maybe just an accident?
Behind the back glass. I
have all new light bulbs on the way. A good number
of them shockingly still work, but a few are burnt out.
I guess I will just replace them all at once, just so they all
light up well and at the same brightness:
Bottom Box
Pictures
Behind the coin door. The coin
mech has been removed and a button was placed there so that
dimes are not needed. This was done likely back in the
1960's:
The coin box:
No where in the machine does it list
any kind of manufacture date, but I did see this patent
notice. I thought maybe some day it might be possible to
see when these patents were obtained to help find the
date. But that does seem pretty ambitious, and I
know nothing about how to find that inforemation, so I will
probably just stick with the 1956 assumed date for the time
being.
The bell which sounds when you get a
strike and etc:
There is one schematic inside the
machine just showing a diagram of the playfield switches and
what is supposed to control what. This might be useful
when trying to troubleshoot my pin problems, where certain
pins are going up at the start of each frame:
This is a shot of those playfield
switches, underneath the playfield obviously:
This is all the innardsin the bottom
box of the machine. Lots and lots of switches and
relays:
Here is a shot of the fuses. I
was initially confused why there was a fuse missing. I was told that
you either have to use the Normal Line OR the Low Line
fuse, not both. If you put a fuse into both, it
might not work at all. I was told
that using the normal line just gave the motors and etc a little
more "umph". So I will be keeping these fuses
as they are today, with the Normal Line present and
nothing in the Low Line.
RESTORATION TIME!!!
Update 1/25/2013
I've been working on a few things here
and there, nothing I felt was update worthy until
tonight. So now you're getting a few little updates all
at once.
Pin Hood Repair
I've read many places that the pin hood
is pretty fragile. Many of them collapse in the
tip. That is due to the kerf cuts that they use to round
the piece of wood. They cut slots in repeated rows
and then eventually just bend the wood into a
curve. See below:
I decided to give the tip a little more
stability. To do so, I've been filling in the gaps in
the kerf cuts with wood glue. Once I'm done with
this, the tip should be a lot more solid.
Next I decided to tackle the pin
guard. Most hobbyists don't have one of these on their
machine any more. But my grandma would prefer it
be there because there are a LOT of great-grandkids who are
inevitably going to crawl all over this thing. Below you
can see the original. It's yellowed and its
cracked in a few places. On the right you can even see
that theres a screw holding a cracked part of it
together.
To make a new guard, I needed to bend
plexiglass into the correct shape. To do so, I
needed to use some sort of mold. Now unfortunately, the
old plexiglass is pretty warped, so I couldn't exactly use it
as a mold. So what I decided to do was
just build my own. Below you can see the basic
shape of my mold I started to piece together:
Here's a shot of the backview of the
mold. You can see everything is screwed together holding
it in place.
It took quite a bit of tinkering to get
it right but I was able to get it so the hood sat on my mold
just right, as you can see below.
Next it was time to cut my
plexiglass to size. The sheet I got was pretty
large, so it took a little doing. I carefully
measured the length and the height of the guard, and cut the
new piece of plexi to size. I initally tried to
cut the plexi with a utility knife and then bend it to snap
it, but that didn't work too well for me. I ended
up cracking my piece of glass. Luckily, since the
sheet was so big, I had enough for two guards. So
I tried again, this time I used a router and a flush bit to
cut through the plexi. This was infinitely
easier. The plexi cut smoothly. Once
the plexi was the right size, I also rounded the corners of
the plexi so there wouldn't be sharp edges at the
corners. As a bonus, the cracked plexi was still
servicable, so I had a piece to use to test out my process
first. First, I clamped one side
to my mold. Note I left the plastic scratch cover
that comes on the plexi there for all of this.
I then used a heat gun. I
made three or four passes with the heat gun and then I'd
gently bend the plexi along the round of the paint
cans. I just kept repeating that
process. Three or four swipes, and a gentle bend,
until it was bent all the way around.
Once it made it's way all the way
around, I clamped it into place on the right side as
well. I gave the front a few more swipes with the
heat gun at this point. These last passes with the heat
gun are important, that way you know the plexi is really bent
to shape, and it's not just the clamps holding it
there. Once everything was set, I left everything
all clamped up until the plexi cooled to the
touch. That's when I knew it's new shape had
set.
Here you can see my test guard
with it's plastic scratch guard off. You can tell it's
the test one if you look really close. Theres a crack in
the lower left of the glass. But crack aside, it
looks perfect to me!
Here you can see it matches up pretty close with
the original. It's more straight, since the original has
warped so much. So it passed my tests. Then
I just rinsed, and repeated this whole process with
my non-cracked piece of plexi to get my official replacement
guard.
What I did next was clamp it into
place. You can see below it fits in there
perfectly.
The real reason I clamped it in place
is because I wanted to drill the holes in it, for the screws
that hold it in place. You can see the red dots for the
holes below. No real secret to this part, I just
used a drill bit to cut the holes out for me.
And here's the shot of the old one last
time, and the new one behind it. Note the new
one still has it's peelable scratch protectant on it, so that's
why it appears to have that matte finish to it.
It will be crystal clear once I take it off. I plan
on leaving this there until I actually intend to put
everything back together.
Light
Bulb Replacement
I've been toying with the idea to
replace all the light bulbs on the machine with LED ones. There's two main benefits that
would have came from doing this. First, they would be
less likely to burn out. Second, and more
importantly, they would put out less heat. This is
important because heat chips the art on the backglass.
So the lower the heat the better. I ordered several
three different LEDs, all of which you can see on the right
side below. On the far left is the
original bulbs. As you can see, the light color is different
on the LEDs, two of them are more white
colored than the original, and the one is more yellow colored.
Also, they appear to be not quite as bright as the
original.
I wouldn't have cared about the color
difference if it made the back glass light up as well.
The new bulbs are under the letters D, C, and I below.
As you can see they don't light up very well at all, and in
the case of the yellow LED, it actually makes a very distinct
circle of light appear. So that settled it, LEDs
are out. Oh well. I did replace
all the light bulbs with brand new ones though. Some of
the bulbs are probably 60+ years old at this point and from
what I've heard, older light bulbs can tend to put out more
heat. So that's why I still replaced all the light
bulbs, even the working ones.
#1
Pin Hanging Repair
Here you can see the little bow-tie
piece is missing from the #1 pin. As I mentioned before,
this piece is what locks the pin in place. Since
it's missing, it causes the pin to swing freely when in the
down position. It stops quickly, and doesn't affect gameplay,
but still, it needs to be fixed so it locks in place like all
the other pins.
Here you can see the replacement piece
that I got from Big
Ball Bowler. The bowtie is there.
Here you can see the two parts side by
side. They match up except for the brown bar on the new
piece. You can see that it's much larger than the
original on the left.
I figured that when it was installed,
if it didn't touch anything, then no harm, no foul.
Unfortunately, that was not the case. You can see below
that this piece rests on the bulb holder next to
it. I (foolishly) thought perhaps even this
might be ok, because the brown tube appeared to be
plastic. So I turned the machine on, and sure enough,
sparks shot out and all the lights went out.
Initially I was freaked out because I thought I ruined the
whole machine! But it ended up just being a blown
fuse. Once I got a new one, everything was
cool. So lesson learned, if it doesn't fit right,
don't be lazy, fix it.
Here you can see I chopped off the
excess part of the bar and it fits nicely!
And lastly I just had to solder on the
wire again as you can see below.
Pin
Cleaning
After 57 years of use, these pins got a
little grimey. Luckily it was mostly superficial and the
pins themselves are really in incredibly good
shape. But here are a few pictures of the pins
before cleaning.
Here is the back of the pins.
Here you can REALLY see the dirt on there!
I first just used some Dawn and warm
water and I gave the pins a good cleaning. Next I used
Novus Plastic Cleaner/Polish on each of the pins. Here
they are all cleaned up! They look brand new (except for
the broken #3pin)!
This is MUCH better now as
well! I also took the time to super glue a lot of those areas
under the mounting holes towards the top of the pins. A few of
them had cracked, so I thought they could use a
little reinforcement, so I glued each of them.
Update
1/31/2013
Got a few updates I thought I'd
share. A few obstacles cleared, with a few more to
go!
Final
Hood Repair
Once again, here is the pin hood
tip. Lots of people said their hoods have broken here
due to these kerf cuts. You can even see a few chips
have or are falling out below. BEFORE:
Here you can see that I finished
gluing all the kerf cuts that were in the front of the pin
hood. This tip is MUCH more solid now than it was
before. AFTER:
Pin
Reset Motor Cleaning
This is the part inside of the pin
hood which resets all the pins at the start of a frame.
I was told that this was the one piece that I probably would
not find a replacement for, and that I needed to be very
careful with it.
My cousin Dan and I took apart the pin
reset motor and cleaned out all the old caked on grease.
Then we used the 3-in-1 oil to lube it up. I don't
have any pictures of the actual clean up but the assembly
seemed to glide more much cleanly afterwards than
before. I also used this 6 pin connector assembly
for all the cords. So now I can easily remove the motor
from the machine just by unplugging this one connector if
needed.
Score
Reels Cleaning
Next up my cousin Dan and I cleaned
the score reels. Here's all six of them:
There were two main parts that we
cleaned once we took it apart. There was this assembly
here that was caked on with grease. You can see below
it's nice and clean.
Here is the other part that we
cleaned. This was the part that I believe was the culprit for
all the scoring issues on this machine. The inside of
these were so caked with oil dry oil that they barely
moved. And because they barely moved, the reels did not
want to step up to the next number. As you can see below
we used q-tips and alcohol to clean all the gunk out of
these:
Here you can see the four main areas
that we cleaned out for the grease. You can still
see some of the grease in the picture below. Once all
cleaned up we lubed up any area that had metal to metal
contact. If it was some kind of plastic and metal
that were touching, we did not lube those up.
The score reels themselves were in
pretty good condition thankfully. Since they're
made of paper, they're very hard to clean. Still,
we decided to do what we could to make them look even
better. We used white bread to rub against the paper
reels. It took off some of the dirt and dust that was
appearing on them:
Each reel has either 3 or 5
solder connectors on them. I took these score
reels home for cleaning, to do that I had
to cut the wires off of these. Then once home I
used a soldering iron and a de-soldering pump to remove all
the solder on each of these connections. I decided
to use quick disconnects (shown below) instead of solder to
re-attach these back in the machine. I'm not that
great at soldering, and I figured it would be nice to be able
to remove a score reel easily if I ever needed
to. Some people on the forums are skeptical
of this solution. They are worried that these
disconnects might shake and eventually fall off.
However, I found the right size connector that fits all the
way over the solder point as you can see below. If
done correctly, they fit on there very snugly. So I
think we'll be ok. But nonetheless, it's something
I will have to keep an eye on. If issues arise
with the connectors falling off, then I will have to solder
the wires on there. Then if I really wanted to, I
could use those 6 pin connector assemblies like I did with the
pin reset motor. I will just place the connectors a
little far away from the score reels so they don't shake as
much. But we'll play that by ear, I'm pretty
confident that these quick disconnects will work just
fine.
Here you can see all the quick
disconnects already attached to the wiring for the score
reels:
Just another close up of all the
connectors:
So that's all there is for this
update! My more immediate plans are as
follows: - Cleaning the stepper units. -
Using a wire brush to clean all the connectors inside of the
machine. - Giving the bottom box a good
vaccuuming.
Update 3/22/2013
Time
for my final update! But first, there's been
some interesting discussion about this machine on the forum
lately. Someone pointed out that the artwork on
the machine appears to have been altered. They
said that the "Duck Pin" text does not match up with the rest
of the artwork. And I'm inclined to agree with
that. If you check out the picture below you can see
that the Duck Pin text is a very different style than the work
Alley next to it. It looks like someone hand
painted those words on there. Not to mention that the red
and yellow colors appear
to be
different looking...more on that in a minute. If you remember
what I mentioned before, this machine appears to be clearly
related to this Pool
Alley machine. The artwork actually appears to match up
entirely with the exception of the title and the "Double" and
"Triple" blocks which have been replaced with a ball and pin
and a "Beer Frame".
Here you can see the two other blocks
which have possibly been scraped off the "Pool Alley" machine
linked above, and repainted with something else.
My own personal belief is that this
modifcation was not done by some individual, but
was done by United themselves. Perhaps they had a lot of
the Pool Alley parts lying around and decided to reuse
them for this. Also, although the color of the yellow
and red above appear to be slightly different
than the rest of the artwork, but when the artwork is lit
up, it matches perfectly. There is just a silver coating
on the back of the glass that gives it
a darker appearance in the rest of the artwork. For the modified
art parts, they used a different back coating, other than
silver. So it looks different with the lights off, but with
the lights on you can clearly tell it is the exact colors
used elsewhere. So they did use the exact same
paint.
Here is a screenshot of the Pool Alley
machine, where you can clearly see the artwork is exactly the
same, except for the parts I mentioned:
Also, there is other evidence that this
machine is simply a modified Pool Alley machine.
You can see in the picture below that the pin hood is using an
extra block of wood at the top of it, to raise the pin hood up
taller. Seems like this would be because the Pool Alley
used a pool ball which is much smaller than the four inch ball
used with this game:
You can also see here on the side of
the machine, that this is where the Pool Alley machine would
have ended, and they added this whole frame onto the back to
make it longer:
Here is a screenshot of the Pool Alley
to give you some reference:
I have no way of proving whether or
not the United company did this themselves, but I am pretty
sure they did. My grandparents bought it in
1962. We suspect it was built in 1956.
So I can't possibly fathom why a single person would hack up a
new machine within it's first 6 years of life to make
something different. Especially since it was just a bar
that owned this machine before my grandparents. And they
just had it in the bar, it's not like they were some
hobbyist/collector.
I have not been able to find anyone
else who has this machine. Only two people out of
probably hundreds who have seen this machine now, have said
they have even seen such a machine before. Neither
of those people have any pictures or know the actual owner of
the machine they saw. So while I can't say that
this machine is one of a kind for certain, it certainly does
seem to be at least very rare. That doesn't
mean this machine is worth a million dollars or anything, but
it just makes it a little more interesting is all. As
they say on Pawn Stars, just because it's one of a kind,
doesn't necessarily mean it's worth a lot of
money. But I like it, it just adds a little
intrigue to the game's history.
Anyway, onto the restoration
photos!
I had been trying to find a replacement #3 pin
for a while, since the one that I have is super glued
together. I eventually did find someone, Mickey from
CoinOpNy.com, who had a replacement for me. There
was a bit of a miscommunication at first and he sent me this
massive #3 pin on the left. The #8 pin is what size pins
my machine actually uses. I just had to post a
picture of this #3 pin because I thought it was funny that it
was so huge. It looks exactly the same,
just larger. Some of the other United bowling
machines use these larger pins:
I'm told that my pins are more the
size you typically see on a shuffle machine and not a ball
bowler machine. Well, I sent the big #3 back to
Mickey and he was able to locate this beautiful blank pin for
me that was the correct size. So thanks again
Mickey! But since there's no number on it, and my
existing #3 pin was working fine with the super glue, I
decided just to hang onto this pin as a backup, in case one of
the other pins ever breaks. It's actually sort of
nice that it doesn't have a number on it. It will
make it easier to use for any of the other pins in the future
if needed.
I hooked up the score reels to my
controversial quick disconnects I mentioned before. So
far so good! They fit on there VERY snugly after after a
month of use, still no issues. I guess time will tell if
they stay put for years to come. But for the time being,
they work great, and because of how snug they were, I don't
think it will be an issue going forward
Here you can see the pin rest motor
all cleaned up from before, and back in place with it's new
molex connector there in case it ever needs to be removed and
serviced:
One of the things I wanted to fix was
the little support bar they put under the pin hood. It's
just this little metal "L" shaped bar to hold the hood up
while you have it opened for service:
Just having
the one bar seemed very tenative. It didn't seem
to be holding it very securely and I didn't like it.
Granted you probably won't have the pin hood open for too long
at a time, but still, when it is opened, I don't want to have
to worry about it slamming down, or breaking something.
So I decided to add another one to the right
side. With both supports in place the pin hood is
a LOT more secure now:
The next thing I did was take apart
all the big disconnects in the game and use a wire brush to
clean off all the connectors:
Again a special thanks to my
cousin Dan for these next few parts. He was a huge
help and I was happy to have him around. For the
next part we took apart the stepper units on the
machine. On the one on the right you can see we have all
the parts removed for cleaning. The one of the left is
still assembled. Just to give you an idea of how many
little parts go into these things.
We cleaned off all the parts of all
the caked on grease from 1956 that no doubt was causing some
issues. We put a small amount of contact grease back in
the few areas where there are metal to metal contact.
The next item Dan and I tackled was
the piece of wood behind the pin hood. Not sure
how exactly but after all these years, this particular piece
of wood was twisted and beat up as you can see
below. The balls roll flat down the lane, so I'm
not sure how they would have ever hit this piece of
wood. But nonetheless it happened, so we decided to
replace it.
Here you can see the new board in
place:
Next I put in the new plexiglass guard
that I made and screwed it in place. It fit great and
getting rid of that old yellowed one made the machine look so
much better. You'll see more pictures of this in
the completed pictures at the end.
The last part of this restoration
wasthe hardest and the most confusing. This
was where I had to correct the pin relays bank in the
bottom box of the machine. When a ball rolls down
the lane, it will get to the roll over switches at the end of
the lane. Those roll over switches trigger these relays
in the bottom box. You can see below that each
individual pin has it's own bank of switches:
And in this picture you can kind of
get an idea of just how complicated each one of these relays
is. There is a series of switches for each one. If
you have one little switch bent wrong, it can break 5
different things and cause the pins not to function
right. Unforunately this game did not come with a
schematic for these, so I was kind of on my own to figure them
out. When I started this, there were several
issues with pins not triggering correctly. And
there was an issue where some of the pins would get triggered
at the start of every frame, even without having thrown a ball
yet. So there were some serious issues here.
After maybe
10 hours hunched over this machine, playing with each one of
these individual switches, I believe I now have it working
pretty danged well! So I'm happy to call this game
completed!
Completed!!
I made this little guy for fun. :)
So
here are some pictures of the machine now that it's
completed! The main difference is really in how
the game functions because it works and scores correctly
now! But there are definitely some improvements in the
appearance of the pins now that I've polished the pins and
gotten rid of the yellowed pin guard.
Here's a great picture of the pins and
guard looking all clean and new:
Just another picture for good
measure.
I just liked the perspective of this
photo. Some of these bulbs were burned out when I
started to work on the machine and having them all lit
combined with all the other clean parts just makes the pins
look awesome.
And here's what it's all
about! My grandma next to the restored
machine. Had she been positioned just a little bit
to the left it would have looked like she has antlers.
:) It's been great spending more time over there
with her, and was most enjoyable bowling a few games against
her now that it's completed! I won't tell you who
won...
Thanks for following along!
Resources
I thought I would just put a few links
of all the various pieces of information I've found to be
useful for this project, just in case it's helpful to anyone
else.
The International Arcade
Museum (KLOV) This site has a listing of (almost) all
the known arcade games out there. This machine isn't on
there yet, but I will be adding it at some point! The Pool
Alley machine information is found on this site however. Also, the forum
on this site has a great and active community. So far
there have been several people who were more than willing to
help.
CoinOpNy.com Mickey from this site has been amazing so
far. I am hopeful that he will be able to find me the
few replacement parts that I may need for this project.
It's always great to talk to someone who just appreciates the
hobby so much! I also found these great videos on his
YouTube channel about how to repair these types of
machines! - Fixing
electromechanical ball bowlers part 1 - Fixing
electromechanical ball bowlers part 2
St. Louis Ball Bowler
Company Chris from this
company didn't have any parts for me, however he was very
helpful in getting me lots of information he knew about the
machine.
Big Ball Bowler I did speak with Doc Doom from this
site. He was very helpful. He's the only other
person who had seen this machine before, though the other
machine is in rough shape he said. He may have some
replacement parts for me as well when I get to that
part.
PinRepair.com This
website is a wealth of information. You can check out this page
specifically here for a
detailed history on bowling machine. I actually gave the
people from this website the link to mine, and they've now
included pictures of this machine on their history page.
Here is
the link to their page about it, which just has my
pictures. This page
talks about how to clean and repair all sorts of
Electro-Mechanical (EM) machines, including bowling
machines. It's going to be VERY helpful once I
start to actually get to the repair work on this thing! This page
talks about a DVD that is available for sale regarding
repairing ball bowler machines. I ordered it and it's on the
way!
The Pinball
Resource This site does have some parts for bowlers but
not for this one. I also reached out to them and they
did not have any manuals or schematics for this machine
either.
Still I thought I would include a link to their
site since other people with ball bowler machines may find them
useful.